Peanut Butter Dream Bars are assembled in layers, making the process simple and forgiving.
Careful layering ensures clean slices and a visually appealing result.
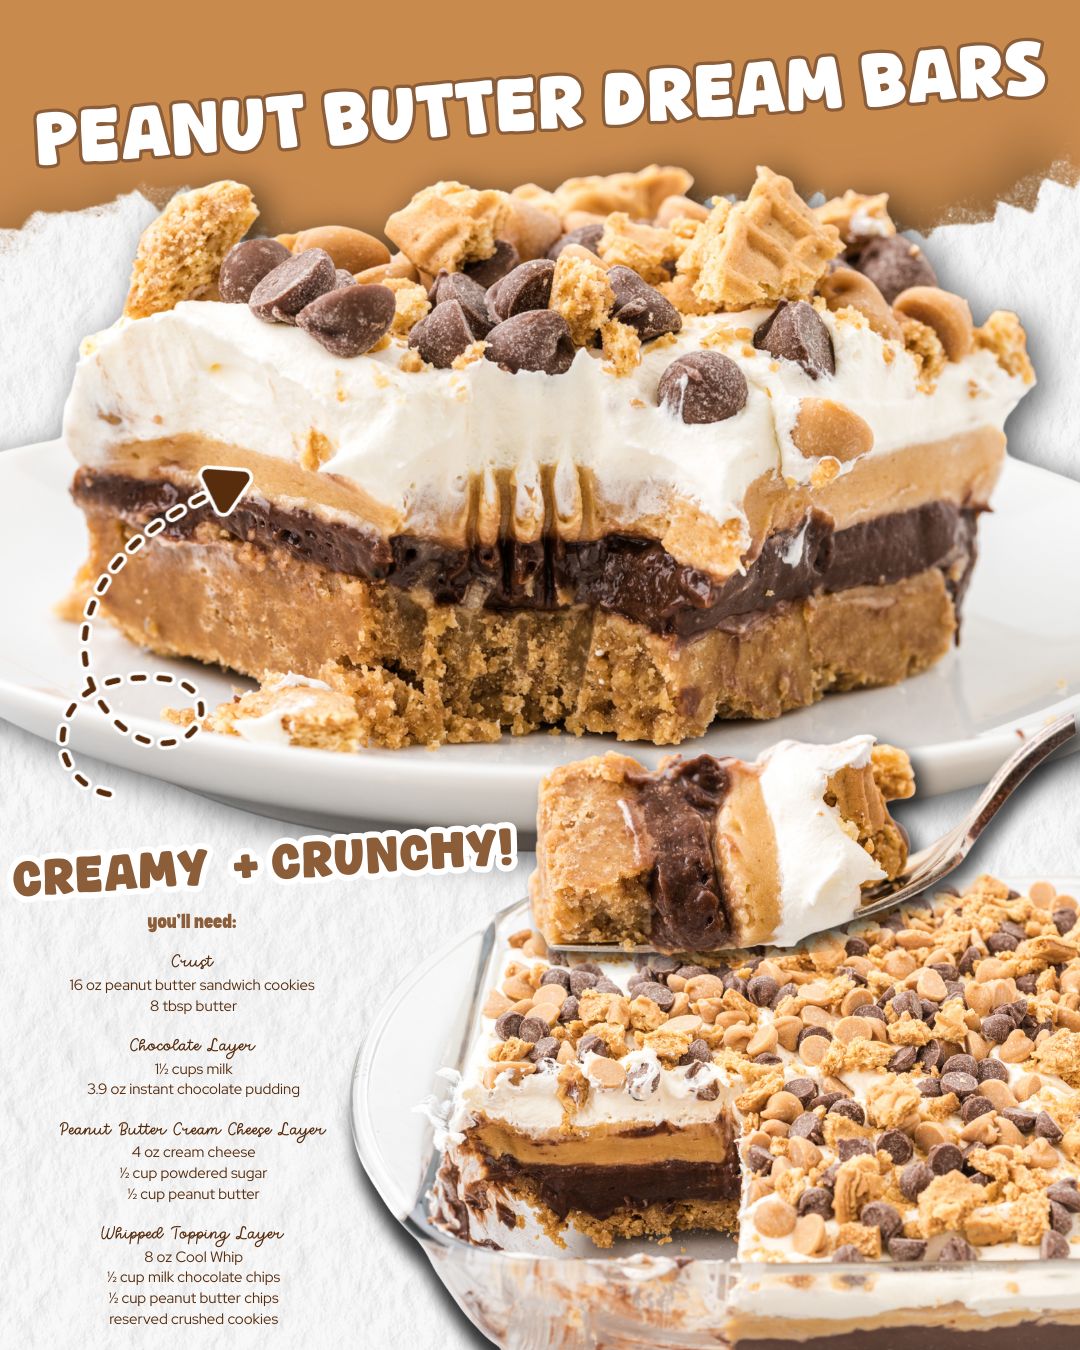
- Prepare the crust: Crush most of the peanut butter sandwich cookies into fine crumbs,
reserving some for later. Mix the crumbs with melted unsalted butter until evenly coated. - Form the base: Press the cookie mixture firmly into the bottom of a 9×13-inch pan.
Use the back of a spoon or a flat surface to create an even layer. Chill briefly to set. - Make the pudding layer: In a bowl, whisk together the milk and instant chocolate pudding mix
until thickened. Set aside for a few minutes. - Prepare the peanut butter cream: In a separate bowl, beat the cream cheese until smooth.
Add powdered sugar and creamy peanut butter, mixing until fully combined. - Fold in Cool Whip: Gently fold the Cool Whip into the peanut butter mixture until light and fluffy.
- Assemble the layers: Spread the peanut butter cream evenly over the chilled cookie crust.
Follow with a smooth layer of chocolate pudding on top. - Add toppings: Sprinkle milk chocolate chips, peanut butter chips, and reserved cookie pieces over the top.
- Chill: Refrigerate the assembled bars for at least 3–4 hours, or until fully set.
- Slice and serve: Once chilled, cut into squares or bars using a sharp knife.
The result is a layered dessert with clean lines, rich flavor, and a texture that holds together beautifully.
Serving and Storage
Peanut Butter Dream Bars are best served chilled, which helps maintain their structure and enhances the creamy layers.
They are easy to portion, making them ideal for serving large groups.
For serving, arrange the bars on a platter or dessert tray. Because they are rich, smaller portions are often sufficient
and appreciated.
For storage:
- Cover the pan tightly or transfer bars to an airtight container.
- Refrigerate for up to 4–5 days.
- For longer storage, freeze individual bars and thaw in the refrigerator before serving.
Keeping the bars cold ensures the layers remain firm and visually appealing.
Tips
These tips can help you achieve the best results and adapt the recipe as needed:
- Use room-temperature cream cheese: This ensures a smooth, lump-free filling.
- Press the crust firmly: A compact base prevents crumbling when slicing.
- Chill between layers: Brief chilling can help keep layers distinct.
- Clean slices: Wipe the knife between cuts for neat presentation.
- Customize toppings: Add extra chips or drizzle melted chocolate for a decorative finish.
Small adjustments like these can elevate both appearance and texture.
Conclusion
Peanut Butter Dream Bars are a reliable, crowd-pleasing dessert that delivers big flavor with minimal effort.
Their no-bake preparation, layered structure, and familiar ingredients make them approachable for cooks of all skill levels.
Whether you are hosting a large gathering or simply need a dessert that can be made ahead of time, these bars offer
both convenience and indulgence. The combination of peanut butter, chocolate, and creamy layers ensures they will
disappear quickly from any dessert table.
By following this guide, you can confidently prepare a dessert that looks impressive, slices cleanly, and satisfies
even the most enthusiastic sweet tooth.
FAQ
Can I make Peanut Butter Dream Bars ahead of time?
Yes, these bars are ideal for making ahead and actually improve in texture after chilling.
Do I need to bake the crust?
No baking is required. Chilling the crust is enough to help it set firmly.
Can I substitute homemade whipped cream for Cool Whip?
Yes, stabilized whipped cream can be used, but Cool Whip offers the most consistent structure.
Why are my bars too soft?
They may need additional chilling time. Ensure all layers are fully set before slicing.
Are these bars suitable for large events?
Absolutely. This recipe is designed to serve a crowd and can be easily doubled if needed.
